Are you excited to set up your new Cricut Joy 2? This new addition to the Cricut lineup is great for beginners or small business owners. It is the updated version of the original Cricut Joy machine. It is compact and allows you to create projects even on the go. This new model has slightly different features from its predecessor, which you will learn about in this guide.
If you’re a beginner, setting up a Cricut Joy 2 may make you feel a little anxious. However, following this guide will help you set up your machine easily. The Cricut Joy 2 is similar to its predecessor, but it supports Bluetooth Low Energy (BLE) technology to connect to your device. If you are wondering how to set it up, this guide provides detailed steps.
Step 1: Power on Your Cricut Joy 2
Unlike the previous ‘Cricut Joy model‘, this machine does not have a power button. It turns on when you plug it into the wall outlet. So, before plugging it in, unpack it and check that it has all the necessary items, including a power adapter and regional adapters. Also, check whether it includes materials, tools, and accessories such as vinyl, a premium fine-point cutting tool, a cutting mat, a weeding tool, and cardstock.
Then connect the ‘power adapter‘ to the back of your machine and to the wall outlet. Once plugged in, the machine turns on automatically and is ready for setup.
Step 2: Install Cricut Design Space on Your Device
You must download and install Cricut Design Space to set up your Cricut Joy 2, just like other Cricut cutting machines. You can install it on your computer or mobile phone to set up your new machine. You need to register your machine in the app before using it.
Computer
If you use a Windows or Mac computer, installing the Design Space software is very simple. Follow the steps in the section below to download and install it.
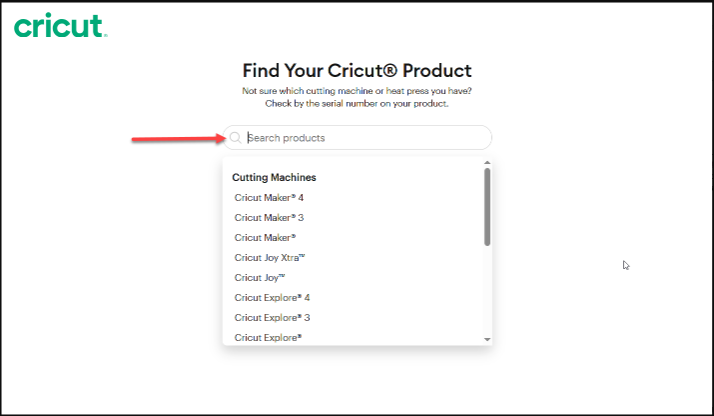
- Visit design.cricut.com/setup in your browser, and enter your machine’s name in the search box.
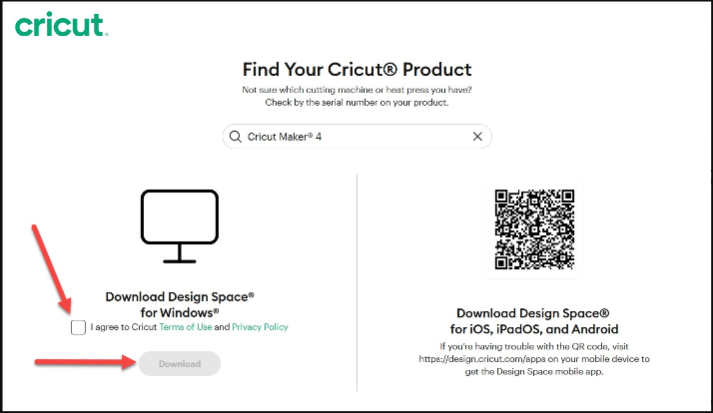
- Check the box to accept the Cricut Terms of Use and Privacy Policy, and then click the Download button to download the Design Space.
- Once the download is complete, go to the Downloads folder and double-click on the file.
- You’ll see an installation window; let it progress.
- If you have a Mac, click the Save option to save the file, and the download will start.
- Then drag the Design Space icon into the Applications folder.
- Now, open Cricut Design Space to launch the software.
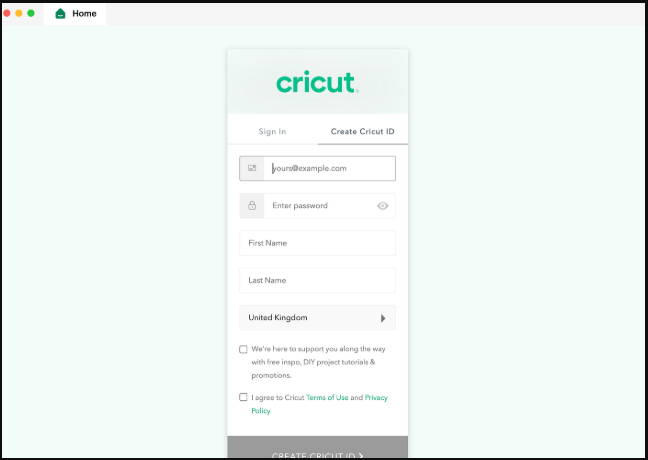
- When you open the software, it will prompt you to sign in or create an account.
- Enter your Cricut username and password if you’re an existing user, or click the Create Cricut ID option to create a new ID. Enter your full name, country or region, email address, and set a password.
- Follow all the instructions of ‘Cricut Design Space‘ to continue with the new product setup.
Smartphone
If you use Android or iOS, install the official ‘Cricut Design Space app‘ to access your machine. Here are the steps to install it:
- Open the Play Store or the App Store on your mobile device, and search for Cricut Design Space.
- Once you see the Cricut icon, select it, and tap the “Get” or “Install.”
- When the installation is done, the app will appear with your other apps.
- Tap the icon to open the app, and sign in or create an account. If you’re a beginner, click “Create Cricut ID,” enter your details, and create a strong password.
- Finally, follow the on-screen instructions in Cricut Design Space to set up your new machine.
Step 3: Pair a Cricut Joy 2 With Your Device
Now connect your machine to your computer or phone via Bluetooth. The Cricut Joy 2 doesn’t support a USB connection; it connects to Cricut Design Space via its advanced Bluetooth Low Energy (BLE) technology. Here are the steps to connect your machine to your device.
Computer
- Confirm that your machine is turned on and within 10–15 feet of your Windows computer or mobile phone.
- Enable the Bluetooth option on your Windows or Mac computer:
- Windows: Start menu > Settings > Bluetooth & Devices > Enable Bluetooth.
- Mac: Apple menu > System Settings > Enable Bluetooth.
- Open Cricut Design Space, and click on the machine picker icon in the upper right. You will see the available machines within range in the list.
- Select the ‘Bluetooth ID‘ of your machine, and then the “Connected” option will appear in green.
- If the setup is not complete, the machine picker icon will indicate that, and you need to click “Setup” or the “Update” button to move further.
Smartphone
- Verify that your Cricut machine is turned on and within 10-15 feet of your mobile device.
- Next, navigate to the ‘Bluetooth Settings‘ on your device and enable Bluetooth.
- Go to the Cricut Design Space app and select the Machine picker option in the upper left. Then, you’ll see the machines available within range.
- Select your machine’s Bluetooth ID from the list. Your machine will be listed in an alphanumeric format.
- Cricut Design Space will connect to your crafting machine, and the machine picker icon will show the “Connected” option, indicating that it is ready to use.
After pairing your ‘Cricut Joy 2‘ with your device, load the material on the mat and insert it into the machine. Now, you’re ready to use your machine. Ensure that you take a test cut before creating a final project.
Frequently Asked Questions (FAQs)
How to Connect Cricut Joy 2 to Computer?
Learn how to Connect Cricut joy 2 to computer with easy steps guide.
- First, Plug the Cricut Joy 2 Machine and Turn it on.
- Then, Keep it Close to your System.
- Next, open your Computer’s Bluetooth settings and turn bluetooth on.
- Click to add a new device and select your Cricut joy 2 machine model from the list.
- If a paring code appears, enter 0000, it will work and do the process faster.
- After that, Open Cricut Design space Application and finish the setup.
How to Create a Test Cut on Cricut Joy 2?
Go to Cricut Design Space, click on “Shapes,” and select a basic shape such as a small square.
- Go to Cricut Design Space, click on “Shapes,” and select a basic shape such as a small square.
- If necessary, resize the shape to around 0.5 to 1 inch.
- Hit the “Make It” option and select your load method.
- Drag your shape to the corner of the mat on the preview screen.
- Select your material setting, load the material into the Cricut machine, and let it cut the material.
Why Won’t My Cricut Joy 2 Connect to My Device?
Learn why your Cricut joy 2 Machine not connect to any device in 5 easy steps.
- Step 1: Turn Bluetooth Off and On: Go to your phone, tablet, or computer settings and toggle Bluetooth off, then back on. This refreshes the connection.
- Step 2: Restart Your Cricut Joy 2: Unplug the machine, wait 10–15 seconds, then plug it back in to reset its system.
- Step 3: Forget and Re-pair the Device: In your Bluetooth settings, remove (“forget”) the Cricut Joy 2, then reconnect it like a new device.
- Step 4: Update Cricut Design Space App: Make sure you’re using the latest version of the Cricut Design Space application, as outdated versions can cause connection issues.
- Step 5: Move Closer & Remove Interference: Keep your device within 3–5 feet of the machine and avoid interference from other Bluetooth devices.
Why Is My Cricut Joy 2 Cutting In the Wrong Place or Misaligned?
Learn how to solve the cutting Issue on Cricut joy 2, follow the Easy Steps
- Step 1: Reload the Material Properly: Make sure your material is straight and aligned with the guides before loading it into the Cricut machine.
- Step 2: Check Material Size in Design Space: Ensure the material size selected in the Cricut Design Space matches what you’re actually using.
- Step 3: Clean the Rollers: Dust or debris on the rollers can cause slipping. Gently clean them with a dry cloth.
- Step 4: Use the Correct Material Setting: Choose the right material type in the settings to ensure proper pressure and cutting accuracy.
- Step 5: Perform a Test Cut: Before starting your final project, run a small test cut to check alignment and adjust if needed.